

The Gateway to Streaming: ATEM Mini
The following statement is not hyperbole…. The ATEM Mini is as close to a perfect switcher for someone who is just starting to stream as you will get.
There. I said it…. As close to perfect as you can get. FOR SOMEONE NEW TO STREAMING! That’s the part that most will skim over. The ATEM Mini is for people who are new to streaming. If you know what an ME is, move on. This isn’t for you. Go look at the other ATEM models. If you are new to streaming or have never streamed and your administration is forcing their hand a bit on you starting to stream, keep reading.
The ATEM Mini for BlackMagic Design (BMD) is a four input video switcher that isn’t much larger than a book and weighs less than some sandwiches I have eaten. There are a ton of things built in to the sub $300 switcher that shocked me.

First the simplicity of the setup of the ATEM Mini is something that is hard to describe. Two audio inputs, four HDMI inputs, one HDMI out, one webcam (usb-c), ethernet (not needed - details to follow) and 12v power. That’s it. The beauty of the set up is that the inputs, HDMI out, and webcam out are all you need to get going. I’ll get to the HDMI and audio in bit but the HDMI out and webcam out are probably the two most important things.

The HDMI out only has 1 role at it’s base - program out. The default set up of the ATEM mini has the HDMI out just show the program out. For a teacher that is new to broadcasts, that is great. The knock from the “industry” is that there is no multiview. I respond with “this unit isn’t for “industry.” In a “traditional” switcher, there would be a multiview out so you could see what options you have from the different cameras. I don’t think the market that BMD is going after needs or wants that. The market for these units just wants to quickly and easily get a couple of cameras on the air. Though with the right setup, you can create a preview/program set up - I’ll also cover that later.
The webcam out is a misnomer in my opinion. It is certainly a webcam out. That helps so you don’t have to worry about putting an encoder between the ATEM mini and the computer you are using to stream with. That is one less thing to go wrong for the new to broadcasting teacher. The other thing that the webcam out does that I think should cause BMD to rename that output is that the same cable that sends footage to the computer can be used to connect to ATEM software control, the software to control the ATEM and change advanced settings, etc. This is another thing that I truly believe that BMD did do help that “new to broadcasts” teacher. No longer do you have to know how to set and change IP addresses or connect to a network to control the ATEM. The same cable you are using to push video to the internet can be used to add graphics, change settings, control audio, etc. That my friends is a HUGE deal for a $295 piece of gear.
The four HDMI inputs all have built in, automatic scalers. If you have used other BMD products, you know how big of a deal this is. This means, you can have cameras at different resolutions and frame rates working together in the switcher and not have to worry about changing camera settings or buying converters. The switcher is going to scale to whatever you put in input 1. I tried this during a couple of our basketball broadcasts and was surprised that I could not tell any difference. Sometimes with scalers, there are some pixels around the edge of the screen that get blown out our lose their timing a bit, but I noticed none of that. For the teacher who is new to broadcasting, this is a big deal because you don’t have to get into the camera or the BlackMagic ATEM control software and make a bunch of changes. You simply plug the cameras in and are ready to go.
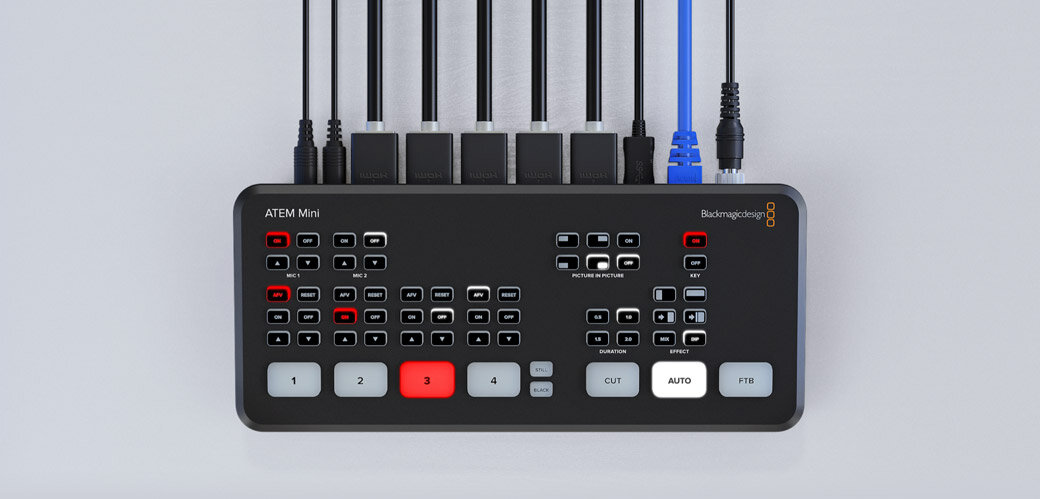
Audio is another HUGE deal on the ATEM Mini. Seriously. A HUGE deal. You have six total audio inputs on the ATEM Mini - two ¼ inputs and four inputs from HDMI sources. Here is what I think is the best part… All of the audio inputs can be mixed on the control surface of the ATEM Mini. Simple on/off, volume up/down, and follow can be controlled right on the control surface. BUT WAIT… “there’s no headphone out…” Monitor it in your live feed. It works fine and 90% of the time during a live event, once the mix is set, it’s not going to change much. If you want to get crazy and add compression and a ton of other things, you can open the ATEM control software and add those as well (through the USB cable mentioned earlier) Again, for the “new to broadcasts” teacher, there’s no need for that. You are probably just nervously working to get on the air.
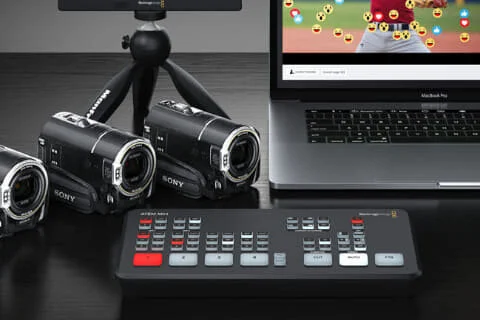
So now that you have cameras and audio, the switching is stupid, crazy simple. The light up buttons will show what source is live by glowing red. If you want to go to a different camera, hit the correct input and BANG - multicam! The default set up is for “hot punching” meaning whatever you push is the hot camera. If you have trained your students to know what they are supposed to shoot, there is no need for a multiview so just punch up what you have. If you are in a studio with locked off cameras, this is even easier!
The next couple of paragraphs are not for the “new to broadcasts” teacher but instead for the teacher who knows how to run tight shows and is looking for a sub-$300 switcher that will fit in a back pack, allows keying, has PIP, and other DVE tools.
Earlier I mentioned that a knock on the ATEM mini is a lack of multiview, here’s the deal. You can control the source of the HDMI out. Set that to preview, change the switching mode in the ATEM control software to program/preview. Now your buttons on the control surface will glow red and green. Red is program. Green is preview. You can monitor your program feed on whatever you are sending the webcam out to and your HDMI source is the preview. It’s that simple. Ideal? For major broadcast companies, probably not, but for a teacher who is trying to build slowly as they learn, this is a great solution.
Also, the ATEM mini has a keyer built in. Input four is set to automatically feed the keyer. So if you want to add graphics or key someone on a set, you can. Simply push the “key on” button and you are good to go. I used it to feed graphics into our broadcasts. I used another computer and a graphics software that had keying colors. Worked like a charm. If you want to do picture in picture, there are 4 default locations and they are simple to set up and manipulate in the ATEM software control.
I started by saying that the ATEM Mini is as close to perfect for “new to broadcasting” teachers but as I wrote, I realized that the unit is probably perfect for all teachers. Seriously, if you are an advanced broadcaster who no longer wants to take thousands of dollars in switching gear on the road, the ATEM mini is a perfect option to get three cameras and a graphics computer out to your viewers. Also the amount of time saved with the simple set up can not be underestimated. BMD did not pay me for this review nor was a given the ATEM mini as a part of the review but I have put in a request to purchase one as soon as possible because I believe it’s that big of a deal for my program and can make a huge impact on what we do while only weighing around a pound and fitting in the palm of my hand.
Meet the Author, Tom White
Tom White is the digital media instructor at Morgan County High School in Madison, GA. Currently teaching TV production and animation pathways, Tom's programs have received state and national honors including the 2016 NFHS Network School Broadcast Program Of The Year.
Prior to teaching, Tom was a marketing, promotions, and online content director for a major radio corporation in Atlanta. Tom studied exercise science at High Point University prior to his radio career. Despite his winding career path, his mother still thinks he is special.